
In this article, I will show you how to insert, update, delete in asp.net mvc using stored procedure in asp.net mvc dapper. The dapper is an open source is used to map Microsoft .Net class to database. It supports database related operations.
Create a simple asp.net mvc c# application.
Step 1: To begin install dapper in the asp.net mvc project by running the following command in the nuget package manager console.
PM> Install-Package Dapper
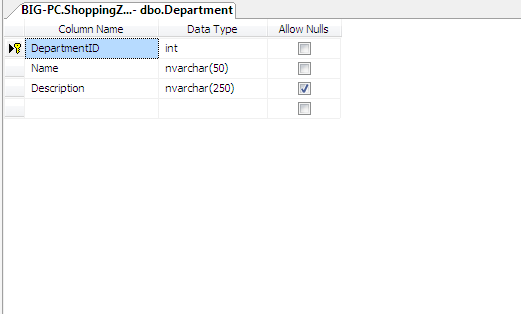
Step 2: Create a SQL table with the following columns as shown in the below figure and name it as Department.
Step 3: Create a SQl stored procedure and name it as dbo.usp_InsertDepartment to insert records.To generate ReferenceID using SQL stored procedure return value refer the previous post. Copy and paste it in SQL server and run.
CREATE PROCEDURE [dbo].[usp_insertDepartment]
(
@Name VARCHAR (50),
@Description VARCHAR (50)
)
AS
BEGIN
INSERT INTO Department (Name,[Description]) VALUES(@Name,@Description)
END
To update records:
CREATE PROCEDURE [dbo].[usp_updateDepartment]
(
@DepartmentID int,
@Name VARCHAR (50),
@Description VARCHAR (50)
)
AS
BEGIN
UPDATE Department SET Name=@Name,
[Description]=@Description
WHERE DepartmentID=@DepartmentID
END
To delete records:
CREATE PROCEDURE [dbo].[usp_DeleteDepartment]
(
@DepartmentId int
)
AS
BEGIN
DELETE FROM Department WHERE DepartmentID=@DepartmentID
END
To Display records:
CREATE PROCEDURE [dbo].[usp_GetDepartment]
AS
BEGIN
SELECT DepartmentID,Name,[Description] FROM Department
END
Step 4: Right click on the model folder and create a class and name it as DepartmentModel. Copy and paste the following code.
public class DepartmentModel
    {
        [Display(Name = "Id")]
        public int DepartmentId { get; set; }
        [Required(ErrorMessage = "Department Name is required.")]
        public string Name { get; set; }
        [Required(ErrorMessage = "Description is required.")]
        public string Description { get; set; }
    }
Step 5: Create another class DepartmentRepository in the model folder. Copy and paste the following code on it.
using Dapper;
using System;
using System.Collections.Generic;
using System.Configuration;
using System.Data;
using System.Data.SqlClient;
using System.Linq;
using System.Web;
public class DepartmentRepository
    {
        public SqlConnection con;
        //To Handle connection related activities
        private void connection()
        {
            string constr = ConfigurationManager.ConnectionStrings["SqlConn"].ToString();
            con = new SqlConnection(constr);
        }
        //To Add Department details
        public void AddDepartment(DepartmentModel objDepartment)
        {
            //Adding the Department
            try
            {
                DynamicParameters param = new DynamicParameters();
                param.Add("@Name", objDepartment.Name);
                param.Add("@Description", objDepartment.Description);
                connection();
                con.Open();
                con.Execute("usp_insertDepartment", param, commandType: CommandType.StoredProcedure);
                con.Close();
            }
            catch (Exception ex)
            {
                throw ex;
            }
        }
        //To view Department details with generic list
        public List<DepartmentModel> GetAllDepartments()
        {
            try
            {
                connection();
                con.Open();
                IList<DepartmentModel> DepartmentList = SqlMapper.Query<DepartmentModel>(
                                  con, "usp_GetDepartment").ToList();
                con.Close();
                return DepartmentList.ToList();
            }
            catch (Exception)
            {
                throw;
            }
        }
        //To Update Department details
        public void UpdateDepartment(DepartmentModel objUpdate)
        {
            try
            {
                connection();
                con.Open();
                con.Execute("usp_updateDepartment", objUpdate, commandType: CommandType.StoredProcedure);
                con.Close();
            }
            catch (Exception)
            {
                throw;
            }
        }
        //To delete Department details
        public bool DeleteDepartment(int Id)
        {
            try
            {
                DynamicParameters param = new DynamicParameters();
                param.Add("@DepartmentId", Id);
                connection();
                con.Open();
                con.Execute("usp_DeleteDepartment", param, commandType: CommandType.StoredProcedure);
                con.Close();
                return true;
            }
            catch (Exception ex)
            {
                //Log error as per your need
                throw ex;
            }
        }
    }
Step 6: Right click on the controller folder and create a new controller and name it as DepartmentController. Inside the DepartmentController copy and paste the following code.
   // GET: Department/GetAllDepartmentDetails
        public ActionResult Index()
        {
            DepartmentRepository DepartmentRepo = new DepartmentRepository();
            return View(DepartmentRepo.GetAllDepartments());
        }
        // GET: Department/AddDepartment
        public ActionResult AddDepartment()
        {
            return View();
        }
        // POST: Department/AddDepartment
        [HttpPost]
        public ActionResult AddDepartment(DepartmentModel Department)
        {
            try
            {
                if (ModelState.IsValid)
                {
                    DepartmentRepository DepartmentRepo = new DepartmentRepository();
                    DepartmentRepo.AddDepartment(Department);
                    ViewBag.Message = "Records added successfully.";
                }
                return RedirectToAction("Index");
            }
            catch
            {
                return RedirectToAction("Index");
            }
        }
        // GET: Bind controls to Update details
        public ActionResult EditDepartmentDetails(int id)
        {
            DepartmentRepository DepartmentRepo = new DepartmentRepository();
            return View(DepartmentRepo.GetAllDepartments().Find(Department => Department.DepartmentId == id));
        }
        // POST:Update the details into database
        [HttpPost]
        public ActionResult EditDepartmentDetails(int id, DepartmentModel obj)
        {
            try
            {
                DepartmentRepository DepartmentRepo = new DepartmentRepository();
                DepartmentRepo.UpdateDepartment(obj);
                return RedirectToAction("Index");
            }
            catch
            {
                return View();
            }
        }
        // GET: Delete  Department details by id
        public ActionResult DeleteDepartment(int id)
        {
            try
            {
                DepartmentRepository DepartmentRepo = new DepartmentRepository();
                if (DepartmentRepo.DeleteDepartment(id))
                {
                    ViewBag.AlertMsg = "Department details deleted successfully";
                }
                return RedirectToAction("Index");
            }
            catch
            {
                return RedirectToAction("GetAllDepartmentDetails");
            }
        }
Step 7: Right click on the index method and create a view named as index. Copy and paste the following code.
@model IEnumerable<MVC_tutorials.Models.DepartmentModel>
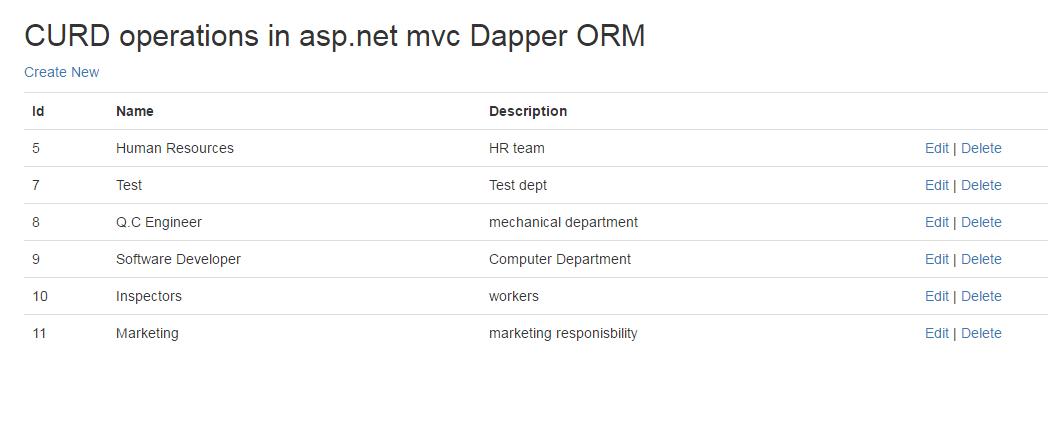
<h2>CURD operations in asp.net mvc Dapper ORM</h2>
<p>
@Html.ActionLink("Create New", "AddDepartment")
</p>
<table class="table">
<tr>
<th>
@Html.DisplayNameFor(model => model.DepartmentId)
</th>
<th>
@Html.DisplayNameFor(model => model.Name)
</th>
<th>
@Html.DisplayNameFor(model => model.Description)
</th>
<th></th>
</tr>
@foreach (var item in Model)
{
<tr>
<td>
@Html.DisplayFor(modelItem => item.DepartmentId)
</td>
<td>
@Html.DisplayFor(modelItem => item.Name)
</td>
<td>
@Html.DisplayFor(modelItem => item.Description)
</td>
<td>
@Html.ActionLink("Edit", "EditDepartmentDetails", new { id = item.DepartmentId }) |
@Html.ActionLink("Delete", "DeleteDepartment", new { id = item.DepartmentId })
</td>
</tr>
}
</table>
Create view for Add department Details:
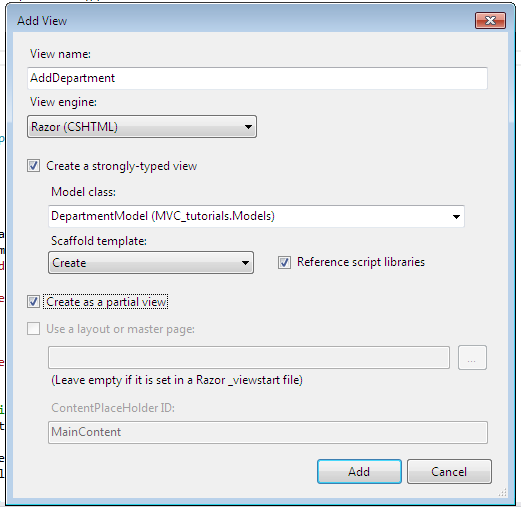
Right click on the AddDepartment Action Method and create strongly dependent view for inserting records. You need to specify the view name, model class as Department and click Add button as shown as below figure.
AddDepartment.cshtml:
@model MVC_tutorials.Models.DepartmentModel
<script src="~/Scripts/jquery-1.8.2.min.js"></script>
<script src="~/Scripts/jquery.validate.min.js"></script>
<script src="~/Scripts/jquery.validate.unobtrusive.min.js"></script>

@using (Html.BeginForm()) {
    @Html.AntiForgeryToken()
    @Html.ValidationSummary(true)

    <fieldset>
        <legend>Create Department</legend>

        <div class="editor-label">
            @Html.LabelFor(model => model.Name)
        </div>
        <div class="editor-field">
            @Html.EditorFor(model => model.Name)
            @Html.ValidationMessageFor(model => model.Name)
        </div>

        <div class="editor-label">
            @Html.LabelFor(model => model.Description)
        </div>
        <div class="editor-field">
            @Html.EditorFor(model => model.Description)
            @Html.ValidationMessageFor(model => model.Description)
        </div>
        <br />
        <p>
            <input type="submit" value="Create" />
        </p>
    </fieldset>
}

<div>
    @Html.ActionLink("Back to List", "Index")
</div>
EditDepartmentDetails.cshtml:
To edit the Department details create the partial view same as AddDepartment.cshtml.
 @model MVC_tutorials.Models.DepartmentModel
<script src="~/Scripts/jquery-1.8.2.min.js"></script>
<script src="~/Scripts/jquery.validate.min.js"></script>
<script src="~/Scripts/jquery.validate.unobtrusive.min.js"></script>
@using (Html.BeginForm()) {
    @Html.AntiForgeryToken()
    @Html.ValidationSummary(true)
    <fieldset>
        <legend>Edit details of Department</legend>

        <div class="editor-label">
            @Html.LabelFor(model => model.Name)
        </div>
        <div class="editor-field">
            @Html.EditorFor(model => model.Name)
            @Html.ValidationMessageFor(model => model.Name)
        </div>

        <div class="editor-label">
            @Html.LabelFor(model => model.Description)
        </div>
        <div class="editor-field">
            @Html.EditorFor(model => model.Description)
            @Html.ValidationMessageFor(model => model.Description)
        </div>
        <br />
        <p>
            <input type="submit" value="Save" />
        </p>
    </fieldset>
}
<div>
    @Html.ActionLink("Back to List", "Index")
</div>
DeleteDepartment.cshtml:
Create strongly typed view for deleting the department details.
@model MVC_tutorials.Models.DepartmentModel
<h3>Are you sure you want to delete this?</h3>
<fieldset>
<legend>DepartmentModel</legend>
<div class="display-label">
@Html.DisplayNameFor(model => model.DepartmentId)
</div>
<div class="display-field">
@Html.DisplayFor(model => model.DepartmentId)
</div>
<div class="display-label">
@Html.DisplayNameFor(model => model.Name)
</div>
<div class="display-field">
@Html.DisplayFor(model => model.Name)
</div>
<div class="display-label">
@Html.DisplayNameFor(model => model.Description)
</div>
<div class="display-field">
@Html.DisplayFor(model => model.Description)
</div>
</fieldset>
@using (Html.BeginForm()) {
@Html.AntiForgeryToken()
<p>
<input type="submit" value="Delete" /> |
@Html.ActionLink("Back to List", "Index")
</p>
}
Description: finally, run the application and click the create button to add the department details. The newly added records are added to the List; you can also edit and delete the department details.
Gridview CURD operations in asp.net using dapper
Post your comments / questions
Recent Article
- ImportError: cannot import name 'url' from 'django.conf.urls' - Django Error
- How to Enable Virtualization in BIOS Security Settings in Intel Processors For Android Studio?
- Dependency 'androidx.activity:activity:1.8.0' requires libraries and applications that depend on it.
- AttributeError: 'NoneType' object has no attribute 'get_text' - Python
- ModuleNotFoundError: No module named 'openpyxl' - Python
- How to get thumbnail from vimeo video URL in Python?
- Remove all special characters, punctuation except spaces from string - Python
- OSError: cannot write mode RGBA as JPEG- Python
Related Article